Mt Ka'ala Trail Photos


You might also consider
More like Mt Ka'ala Trail
Recommended Reviews - Mt Ka'ala Trail
Start your review...

Reviews With Photos

Tremendous, inspiring, magnificent ....Incredible hike....unforgettable experience. Yes it's a challenge, but it's not impossible, and I think the difficulty score it earns must be qualified by a few caveats. So if you are in decent shape and can walk a path for 10 hours at a stretch, and don't mind a few ropes and some boulders, you will do fine. Bottom line: don't let this hike scare you. It's far easier than many other Oahu hikes like Aeia Loop, and Olomana, etc. Here's the synopsis and assessment: awe inspiring scenery not only with the vistas (which are amazing), but also with the diversity of flora and fauna present. You pass through several different ecosystems that are beautiful in their own spectacular ways. While the view from the geological crest is no doubt mesmerizing, on the day we hiked it, the peak was completely engulfed in clouds so the view from Pearl to Haleiwa was non existent. However, below 4K ft, the spectacular vistas materialized once we descended below the cloud cover. Difficulty: hard but Olomana in Kailua is far more brutal and much worse... again, the challenge is still having "legs" left after hiking for 6-11 hours straight. If you are like our 4-person team, with average or above average hiking abilities, it will take slightly longer than some of the previous reviews stated.... there's just no good formula to gauge exactly how fast it will take you so adjust your estimate based on an honest assessment of your individual party's skills. Then add a couple hours for fatigue. Best way to practice is to just do several 8-10 hour "walks" on weekends to build up your endurance. Another nugget: it's far easier on the ascent than descending ... please allow more time for this. Far better you over estimate the time you think it will take and then finish early, than to under estimate and run out of water and food....and daylight... Must brings: Water (3 to 5 L per person), lightweight high protein foods, crampons (absolute must!), insect repellents, sunscreen, full brim hats, sunglasses, very good hiking boots, gloves (another must bring!), clothing that doesn't rub. Recommend long pants due to mud and rocks (and mosquitoes) but it's your call as most of the hikers we met on the way were fine in cargo shorts. Keep to the trail by watching for the omnipresent purple or pink engineer tape hanging on the trees. Respect the land by packing out everything you pack in. We picked up tons of trash that others left behind... please don't be like them. Watch for afternoon rain squalls To prevent vehicle break-in in the small trailhead parking lot, consider parking in Waianae and Uber in to the start of the trailhead. Watch for hunters... it's their land too! Respect Everything and Everyone. Have fun and most importantly: don't take counsel of your fears... this is a great hike! Mahalo for reading my review.

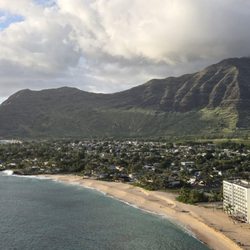
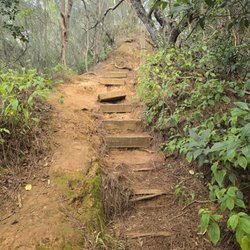
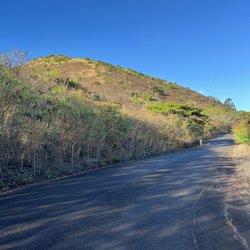
Finally had the chance to do one of the most challenging trails on O'ahu and going up the tallest mountain on the island, Mount Ka'ala! Standing at 4,025 feet above sea level, it is no doubt one of the steepest I have ever done in my life. And it took me 6 hours round-trip altogether; 3 hours going up, 1 hour at the summit to enjoy the views and take photos and videos, and then 2 hours to get back down to Wai'anae! This is essentially three parts. The first one is the long gradual ascent on a paved path (for the first 1.2 miles), then on the dirt path, through the forest and up to the ridge, which is physically hard enough. The second part is on the steep ridge and involves so much climbing, and that is technically and physically challenging. The final part is when you get into the Mount Ka'ala Nature Preserve, which is flat and fairly easy (you'll end up brushing against a lot of the plants, however). You'll finally see that white iconic dome structure, and that is the summit and end of the trail. There are gates where indicated where you can walk along the outside of the station's fence and enjoy these lovely scenic views! On a clearer day, you can see Hale'iwa and the North Shore, Wahiawa and Central O'ahu, and you might also be able to make out Honolulu and Diamond Head in the far distance. Bottom line is that this is an extremely challenging hike, even if you are very athletic and in great physical shape. If you can't handle the ropes, steps, and rock-climbing very well, then Mount Ka'ala is definitely not for you! Even a few days after doing this, parts of my body are still hurting! Things to bring with you: Water, snacks, hiking gloves (especially for climbing up and down), mosquito repellant, sunscreen, hat. To get to the trailhead, from Wai'anae Town and the Farrington Highway, turn onto Wai'anae Valley Road and take it until you see the one-land Dead End road, and follow that road all the way to the end, where the dirt parking lot and trailhead are located. Don't leave anything in your vehicle, as there have been a number of break-ins over the course of time!

So much fun!! Definitely a tiring hike. It took me and my friend seven hours total (we did spend about 20 minutes looking for the sign that showed how high up we were). Mostly shady going up until you reach the ridge area next to the fence. We had a great view with mostly clear skies once we got up there. Bring snacks and water and also a towel. Although it was mostly dry and had not rained in a bit, we still got a bit muddy. If you are not comfortable with going up/down ropes I don't recommend. You don't need to be the most experienced hiker but definitely make sure you are comfortable with lots of rope climbing.

The hike is long, it took us like 5 hours back and forth. It is a good exercise on a weekend. There was not much of view but the fulfilment that you will feel is rewarding because of hiking the highest peak on Oahu. We were kinda confused where to find the starting point because we are not sure if the trail starts in the dead end street. Take the dead end street and reach the end of it where you can find a parking space. The trail starts in the gate. The first few miles is in pavement. Then it continues with uphill.

Mt. Ka'ala has been on my list to hike for quite some time! It is the highest peak on O'ahu and of course I was determined to conquer the summit AND part of the valley. Mt. Ka'ala was not my longest hike but it definitely was my steepest. There's nothing truly hard about it other than the steepness. There is a few rope sections and rock climbing, but all doable for an intermediate hiker with some climbing experience. But the day we went it was HUMID, voggy, rainy, sunny, and muddy. The vog and humidity made me as an intermediate/advanced hiker HATE parts of this hike and to wonder if I even liked hiking anymore. I never sweated and swore so much on a hike! Now that I'm in my bed, I can say I'm glad I was allowed to go with the group, glad I went, and one and done! Lol Tips: Go early Sunblock and bug spray Gloves and spikes LOTS of water and food! Leave nothing in your car--3 out 6 cars in our group got broken into

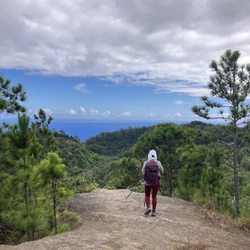
Even in the rain, this is one of my favorite trails. If you're a townie like me and tend to hike town trails, heading out to Wai'anae is a great way to get to some new terrain. It's significantly less-crowded than town trails and the geology, vegetation and overall scenery is very different from hiking in the southern Ko'olau. The trail is easy to find. Head mauka on Wai'anae Valley Road from Farrington. When the road forks roughly a mile back, head left and take the one lane road until it ends. There will be a parking area and a sign indicating "Wai'anae Kai Public Hunting Area." Bear in mind that this area is popular with hunters, so try to wear something obnoxiously bright until you get above the tree line. Take the paved road back a mile. You'll pass by two fenced-off/tank areas. The second has a water spout that serves up delicious water from the area. If you want to spare yourself from carrying a heavy bag up the long, paved portion, you can fill your water bottles here. You'll thank yourself later. After the second tank, follow the dirt road further up. IMPORTANT NOTE: For Ka'ala, follow purple ribbons and bottle caps up and orange indicators down. You can get lost in the valley very easily if you veer off trail. You gain elevation fast. Immediately you head in an almost straight line up to the ridge. The trail is well-cleared and for the most part well-marked. There are steeper sections toward the top and it gets muddy and slick with even a hint of dampness. If you have micro spikes, this is a great trail to have them. You'll reach the 'three poles' lookout at about 2,800 feet. Soak in the view and look east, that's what you'll be climbing next. From a distance the ridge line looks narrow, steep and brutal. Parts of that are true, but like most trails it isn't as bad once you actually get there. Head up the ridge and be careful as it gets narrower and narrower the higher you get. The drop-offs are pretty severe to the right, so keep your distance if you can. A new fence has been installed for the first 1/2 mile or so (to prevent goats), so you can grip that for security if you'd like. You'll reach two boulder sections. The first is not bad and is more like a large staircase. The second is not as bad as it looks. Though the drop off is to the right, you will need to head up that side first. If you look closely you'll see that someone has carved notches into the lower boulder - you can use these for a foot hold as you make your way up. Once you're a bit further up, you'll see a small area leading up the left, almost like a small platform. Because you can't see this from the ground, the climb looks much more difficult than it is. Head up from there and it is easy from that point on. Hug the rocks if you need and keep your hands on the rope and your feet on something supportive. At no point should you be swinging and/or rappelling. After the second boulder section it gets steeper and steeper. There are fewer drop offs but the climb is relentless until you reach the summit. Be ready for lots of ropes and no real place to take a good rest. Make sure to look back at what you just climbed (and continue to climb) - the views are amazing. You'll top out when the trail levels out. Keep heading along the trail and you'll reach the bog. This is a special place filled with some plant species that only live here - and it is fragile. Make sure to brush the dirt off your shoes (tools provided at trail top) on the way in and on the way out. Stay on the boardwalk and don't damage any of the plants. The boardwalk takes half an hour if you're stopping to look closely and take pictures - which you should. At the end of the boardwalk, you'll reach the base. Follow the road right then head left at the fence, you can circle the base to get views of all sides of the island. We were wrapped in a cloud yesterday but will be going back on a clear day to see this. When you're ready, head back down. Be very careful if it's wet since slipping off the ridge line would be a bad way to end your day and/or life. Extra caution is required on the boulders. This is an upper-intermediate trail with some light bouldering/scrambling required. More than anything, it is a leg burner. Avoid this if you're not OK with some exposure to drop offs and if you haven't done some of the longer town trails. I think a good practice trail would be Kulepeamoa in Niu Valley. The initial ascent is similar - straight up from the valley floor to gain the ridge line, and the climbs, while on different terrain, are close in level of difficulty. Kuliouou West (not the state trail) would be another good one to do prior to Ka'ala, as well. Note that this is not a good trail for dogs (above three poles lookout) and hunters' dogs and hikers' dogs sometimes get in fights. This is also not a good hike for kids if you venture much past the end of the dirt road.

I loved this hike and the view at the top was awesome! We could see the north shore and pearl harbor! But I also do a lot of cardio and hike often so the steep and ongoing incline didn't really bother me. To get there we had to drive down this tiny little one lane road and park at the end where there was a gate. Once we started, we walked on a paved path with a slight incline for about a mile and a half before we got to the trail. We walked up the trail for a little bit and saw a picnic table, here the trail went off to the right. After a while there was a split and we took the left side which goes down to a little stream that we crossed and continued to another split about a quarter to half a mile away. We took the right side which is very marked with trail tape. From here, it's ALL uphill! My thighs were burning! After awhile we got to the top of the steep incline up to the fence that divides the mountains and it was dry and slippery with loose sand. Eventually we got to series of ropes which were all in good condition when I went through. When the incline finally evened out there was a little reserve and a wooden walkway through it. Once we made it through this reserve we were there! We made it to the top and it felt so good! There is a military radar installation at the top, but it is fenced off and you are allowed to walk around the fence on the nice grassy area. Overall this hike was a great workout and I am extremely happy I did it. It took about 5 hours round trip, not counting the one hour break we took at the top to admire the scenery. The trip up was quite the trek with a significant incline, but hey the best things in life take work! Tips: -Bring plenty of water. The incline is tiring and there are parts that aren't shaded so you WILL get thirsty. I'm 110lbs and 2L of water was sufficient for me. -Start early. Not only to beat the heat, but when we got there, there were no clouds but they developed significantly during our hour of sitting there due to diurnal heating. -Bring a snack. You will be happy you did when you get to the top.

As good as it gets with challenging gains in elevation; breathtaking scenery, native plants, cool native snails, fruits along the way. The trail is considered challenging and requires some upper strength at the rock and rope sections. Reaching the summit is oh so worth it. Bring lunch! This is a hike for those who seek challenge as well as those who appreciate the beauty surrounding our island. It is a well maintained trail. Few areas of drop offs but nothing like sheer cliffs. It can be a muddy trail so for better traction, I suggest spikes. You don't have to but for comfort and ease of mind to not slip on the way down. Ropes, ropes, ropes--and 2 large vertical boulder sections. The first boulder section isn't too bad, the second is a little trickier. I am 5'3" so it was a bit of a climb....had to stop, analyze and receive encouragement from my fellow trekkers. totally appreciated it. Bring at least 2L of water (I had 3.5L and drank 3L); may need bug repellent and sunscreen; shoe spikes and of course your phone or camera. There is service up at the summit and in some areas of the trail. Enjoy!

The highest peak of Oahu! I've been there several times. Amazing views at the top. However the weather changes often and could get sucked in by clouds. Don't forget to bring a jacket if you want to stay at the top to enjoy the view. Please be careful if you plan on driving. This is a high theft area.

Whew, very tough and steep trail. The first 1.5 miles is up a concrete/asphalt road. Just keep going and you'll finally get to the actual hiking trail. From there it's another 2 miles up and about 2500 feet of elevation since you just gained 1000 feet on that damn road. Luckily, most of the trail is shaded so it's not super hot although many portions of the jungle were really humid. Constant uphill to the top but very doable with only a few rock faces that require use of the ropes already in place. Once at the top you'll walk about 1/2 mile on a wooden plank trail until you escape the bog and you'll see the FAA site right in front of you. Sadly for us this past Saturday, we were in the clouds from about 3/4 up until the summit so the views at the top were blah. I'm sure with no clouds the views at the top are great but hey -- I made it to the top of O'ahu and have the pics of the FAA site to confirm it! Took us a little over 5 hours roundtrip to complete this hike. Bring lots of water (I went through 3+ liters), sun block just in case, microspikes, gloves, lunch, and a hat for the shadeless sections. While it was cool at the top, I didn't need a jacket. Glad to have completed this bucket list hike. Don't think I need to repeat since all of the summit trails on-island have spectacular views.

The hike was very muddy and very slippery throughout various areas. It drizzled and poured rain a couple times during the hike. It was humid at times. Other than the paved area that leads to the hike, the hiking trail was covered in foliage for the most part. A bunch of the ropes were so muddy and slippery that I couldn't hold on to the rope; so, I ended up wrapping those ropes around my arm. There were at least 20 ropes (?-lost count) throughout the hike, when you get closer to the top. The ropes were secure when we went in September 2017. Although testing the rope, I couldn't help but wonder just how secure the rope was, especially on the boulders. Although the trail is maintained, there were a few parts of the hike where the erosion of the dirt left very tiny paths where the other side was a steep cliff. While hiking, a young man said he went up to the first rope, and then turned around. While at the bottom of the boulder (mentioned in other blogs), another young man was being told by his friend who made it up the boulder, "...just psych yourself out..."--they both turned around. Another young pair of females said they went up to the picnic table, and then turned around. A father and young son duo turned around... ...so--- while at the 2nd boulder, we had 2nd thoughts about this hike (especially since were warned about all the ropes AFTER the boulders)--but we decided to chug on...The boulders weren't that bad. You can count the people on this hike. There was one other young man who finished the hike around the same time as us. Going up, there were about 6 others on their way down, who had just completed the hike. On our way down from completing the hike, there was a man who said he'd finished the hike in the past, but brought his 10 year old son back to finish the hike this time since his son had stopped at the boulder the last time. The plants at the natural reserve are cool, and makes you feel as though you're walking through some kind of Star Wars movie. I've never seen blue moss before. The clouds covered a lot of the views. It was completely silent up at the top--no sirens, no traffic--just nature. I recommend starting the hike early--just in case you need the extra time before it gets dark. I would not recommended dogs and young children to hike beyond the picnic table. I would not recommend this hike for those individuals who have a "fear of heights."

For a heavy set person I was a bit intimidated to even attempt this hike even after completing Stairway to Heaven and Ku'uau crater, however I decided to be brave and attempt it anyway. Although I finished, this hike was definitely grueling. By the way, if your looking for a bad ass hike with the reward of a great view when you get to the top, this hike is NOT it. This hike is what I'd say is an accomplishment bragging rights type of hike. Seriously, once you get to the top, there's a big field with some satellites to look at, big whoop. Anyway, for this hike I definitely packed too much. Bear in mind this is all uphill. I think there was all of one switch back if you can even call it that so packing enough water and a snack or two is all you need. You don't want that extra weight, TRUST ME. I'd say 3 Liters was what I used, however if your more in shape you probably won't need as much. To start the hike you'll have to walk quite a bit on a paved, inclined road. You'll pass a water station, afterwards there will be a nice big puddle of mud in the road which you can maneuver around. After the mud you'll walk up hill again until you reach another water station. Your probably gonna think your at the trail head at this point, NOT. Your then going to start an unpaved road uphill passing a little picnic table on your left, just a little further is where the head of the trail will be. This hike is definitely going to make you sweat so I'd say bring Extra Clothes for after the hike (leave it in your car) and for those that aren't about being sweaty all the time, an extra shirt (to take with you)for once you get to the top to change for the hike back down. It can get a little chilly up top so if you get cold easily you might want to bring a jacket or some rain gear but remember, pack light. You really don't want to bring too much that will add to the weight, again, TRUST ME on this. All in all, I'm glad I did the hike. My legs are a bit sore but getting to the top, priceless.

Definitely one of my favorite hikes. The first mile or so after the end of Waianae Valley Rd is a standard walk along a paved road. When the road ends, just keep following the purple markers; it's pretty straight-forward. But as many reviewers mention, the climb will get steep. It is a relentless climb to the top. Thankfully there are rope sections to help you, but be sure to test all ropes first. The journey to the radar station at the summit is roughly 4 miles. When you get to the flat summit, you are treated to seeing a selection of native plants and animals! When you get to the FAA radar installation, you can go around the perimeter (preferably along the left side) to get fantastic views of north and central Oahu! At times, you can see all the way to Diamond Head. It is a view unlike any other!

3 years ago
This hike is not for the weak and definitely not for beginners. Mt. Ka'ala is known as the highest point on the island of Oahu but the trip and the end result is well worth your efforts. The whole trip can take about 6-7hrs, up and back. Item I highly recommend you bring with you: -Electrolyte WATER (***I took a whole gallon with me***) -Small snacks ( Nuts, fruit bars, protein/granola bars, musubi, manapua, etc) -Sunscreen (7 hrs in the sun will get you. My face was sunburnt after.) -Hiking spikes (It was slippery even though it wasn't raining.) -Gloves ( You'll be climbing lots of rope!! Your hands will get raw.) -Hiking Bag/Backpack -Wear long sleeves and leggings (The water wicking type to stay cool and protected from the sun and bugs.) -Hat -Sunglasses -Selfie stick -Satellite radio ( I had one just in case but we all had cellular connection the whole trip. ) -Cellphone & rechargeable battery -Bug spray -Good Attitude ( This hike was hard but it wasn't impossible.) I came here with a group of hikers, now my new found friends, and we all pitched in on a giant UHAUL 16-seater van so that we wouldn't have to take our personal vehicles. We did this because the parking lot for this hike is well known for break-ins, so we made sure that nothing was left in the van when we began our hike. From the start, it's all incline and it kept getting more and more steep the further you went in. Majority of the trail is covered by trees and brush so there was plenty of shade. The closer you got to the top, the better the view got and it was pretty fulfilling to feel so high up. Once you reach the Mt. Ka'ala sign and the forest conservation, you get to experience the Hawaiian rain forest where you're required to stay on the wood/metal path laid out to minimize human damage to the environment. You'll know you've reached the top when you see a fenced in building owned by the government. There's a path along the fence line that'll bring you to the final view. Once there, you'll finally be able to take break, sit down, breathe in the cold air and enjoy the amazing view from the clouds as they pass you by. Goodluck, stay safe and happy hiking! read more


A challenging hike for me. The challenge is not from going up hill from the start, like hiking Koko Head, but quarter of a mile to the top, you ascend by trusting the existing ropes are safely secured. My first attempt I made it to 3,600 ft and had leg cramps. Few days later, a second attempt but I started the hike late in the day so I decided to reach the first lookout at 3,000 ft. My third attempt was a charm!! The weather held up with five days of no rain at Mt Ka'ala. Mt Ka'ala is the highest peak, elevation 4,025 ft, on O'ahu. It is also rated the hardest hike, due to constant elevation climb, rope climbing and constant rain, from various hiking blogs. The easiest part of the hike is on top. Once you reach the wooden planks on the plateau it takes about 10 minutes to reach end of the trail. I took 20 minutes, to look at all the different varieties of plants and birds you normally don't see at the lower elevations. I spent a little over an hour enjoying my bento with a million dollar view. I met three hikers at the top who took 1.5 hours from trailhead to plateau. Wow!! It took me four hours, lol. Some suggestions: -Hydrate 1 liter an hour before the hike -Bring energy bars or SPAM musubi, you will burn tons of calories -Good hiking trail shoes, not baseball shoes or Converse--shoes with terrain traction -NO BATHROOM AT THE TOP OR PORTAPOTTY and NO DRINKING WATER -Follow "Leave no trace" policy--TAKE CARE THE AINA -Bring headlight to keep your hands free--cell phone light doesn't count -Hike with a buddy or group -Know your limits -Check the weather day of the hike -Know the trails, use a trail app--multiple forks on trial without signage -Pack a 3 liter bladder -Watch the time--know when sun sets -Basic first aid kit -Cell phone power pack with charger cord -Pocket knife -Tell a friend when you plan to return Finally, on my second attempt, this couple I hiked with, asked, if there was an easier way to reach the top. I said, yes there is! If you are military and stationed at Ka'ala AFS. We laughed. We turned around at 3,000 ft, the first major lookout. It was already late in the day and we didn't want to get caught hiking in the dark. read more
 - Hiking Near Me - Waianae, Hawaii")


Tremendous, inspiring, magnificent ....Incredible hike....unforgettable experience. Yes it's a challenge, but it's not impossible, and I think the difficulty score it earns must be qualified by a few caveats. So if you are in decent shape and can walk a path for 10 hours at a stretch, and don't mind a few ropes and some boulders, you will do fine. Bottom line: don't let this hike scare you. It's far easier than many other Oahu hikes like Aeia Loop, and Olomana, etc. Here's the synopsis and assessment: awe inspiring scenery not only with the vistas (which are amazing), but also with the diversity of flora and fauna present. You pass through several different ecosystems that are beautiful in their own spectacular ways. While the view from the geological crest is no doubt mesmerizing, on the day we hiked it, the peak was completely engulfed in clouds so the view from Pearl to Haleiwa was non existent. However, below 4K ft, the spectacular vistas materialized once we descended below the cloud cover. Difficulty: hard but Olomana in Kailua is far more brutal and much worse... again, the challenge is still having "legs" left after hiking for 6-11 hours straight. If you are like our 4-person team, with average or above average hiking abilities, it will take slightly longer than some of the previous reviews stated.... there's just no good formula to gauge exactly how fast it will take you so adjust your estimate based on an honest assessment of your individual party's skills. Then add a couple hours for fatigue. Best way to practice is to just do several 8-10 hour "walks" on weekends to build up your endurance. Another nugget: it's far easier on the ascent than descending ... please allow more time for this. Far better you over estimate the time you think it will take and then finish early, than to under estimate and run out of water and food....and daylight... Must brings: Water (3 to 5 L per person), lightweight high protein foods, crampons (absolute must!), insect repellents, sunscreen, full brim hats, sunglasses, very good hiking boots, gloves (another must bring!), clothing that doesn't rub. Recommend long pants due to mud and rocks (and mosquitoes) but it's your call as most of the hikers we met on the way were fine in cargo shorts. Keep to the trail by watching for the omnipresent purple or pink engineer tape hanging on the trees. Respect the land by packing out everything you pack in. We picked up tons of trash that others left behind... please don't be like them. Watch for afternoon rain squalls To prevent vehicle break-in in the small trailhead parking lot, consider parking in Waianae and Uber in to the start of the trailhead. Watch for hunters... it's their land too! Respect Everything and Everyone. Have fun and most importantly: don't take counsel of your fears... this is a great hike! Mahalo for reading my review. read more


Finally had the chance to do one of the most challenging trails on O'ahu and going up the tallest mountain on the island, Mount Ka'ala! Standing at 4,025 feet above sea level, it is no doubt one of the steepest I have ever done in my life. And it took me 6 hours round-trip altogether; 3 hours going up, 1 hour at the summit to enjoy the views and take photos and videos, and then 2 hours to get back down to Wai'anae! This is essentially three parts. The first one is the long gradual ascent on a paved path (for the first 1.2 miles), then on the dirt path, through the forest and up to the ridge, which is physically hard enough. The second part is on the steep ridge and involves so much climbing, and that is technically and physically challenging. The final part is when you get into the Mount Ka'ala Nature Preserve, which is flat and fairly easy (you'll end up brushing against a lot of the plants, however). You'll finally see that white iconic dome structure, and that is the summit and end of the trail. There are gates where indicated where you can walk along the outside of the station's fence and enjoy these lovely scenic views! On a clearer day, you can see Hale'iwa and the North Shore, Wahiawa and Central O'ahu, and you might also be able to make out Honolulu and Diamond Head in the far distance. Bottom line is that this is an extremely challenging hike, even if you are very athletic and in great physical shape. If you can't handle the ropes, steps, and rock-climbing very well, then Mount Ka'ala is definitely not for you! Even a few days after doing this, parts of my body are still hurting! Things to bring with you: Water, snacks, hiking gloves (especially for climbing up and down), mosquito repellant, sunscreen, hat. To get to the trailhead, from Wai'anae Town and the Farrington Highway, turn onto Wai'anae Valley Road and take it until you see the one-land Dead End road, and follow that road all the way to the end, where the dirt parking lot and trailhead are located. Don't leave anything in your vehicle, as there have been a number of break-ins over the course of time! read more


4 years ago
So much fun!! Definitely a tiring hike. It took me and my friend seven hours total (we did spend about 20 minutes looking for the sign that showed how high up we were). Mostly shady going up until you reach the ridge area next to the fence. We had a great view with mostly clear skies once we got up there. Bring snacks and water and also a towel. Although it was mostly dry and had not rained in a bit, we still got a bit muddy. If you are not comfortable with going up/down ropes I don't recommend. You don't need to be the most experienced hiker but definitely make sure you are comfortable with lots of rope climbing. read more


8 years ago
The hike is long, it took us like 5 hours back and forth. It is a good exercise on a weekend. There was not much of view but the fulfilment that you will feel is rewarding because of hiking the highest peak on Oahu. We were kinda confused where to find the starting point because we are not sure if the trail starts in the dead end street. Take the dead end street and reach the end of it where you can find a parking space. The trail starts in the gate. The first few miles is in pavement. Then it continues with uphill. read more


Mt. Ka'ala has been on my list to hike for quite some time! It is the highest peak on O'ahu and of course I was determined to conquer the summit AND part of the valley. Mt. Ka'ala was not my longest hike but it definitely was my steepest. There's nothing truly hard about it other than the steepness. There is a few rope sections and rock climbing, but all doable for an intermediate hiker with some climbing experience. But the day we went it was HUMID, voggy, rainy, sunny, and muddy. The vog and humidity made me as an intermediate/advanced hiker HATE parts of this hike and to wonder if I even liked hiking anymore. I never sweated and swore so much on a hike! Now that I'm in my bed, I can say I'm glad I was allowed to go with the group, glad I went, and one and done! Lol Tips: Go early Sunblock and bug spray Gloves and spikes LOTS of water and food! Leave nothing in your car--3 out 6 cars in our group got broken into read more


13 years ago
Even in the rain, this is one of my favorite trails. If you're a townie like me and tend to hike town trails, heading out to Wai'anae is a great way to get to some new terrain. It's significantly less-crowded than town trails and the geology, vegetation and overall scenery is very different from hiking in the southern Ko'olau. The trail is easy to find. Head mauka on Wai'anae Valley Road from Farrington. When the road forks roughly a mile back, head left and take the one lane road until it ends. There will be a parking area and a sign indicating "Wai'anae Kai Public Hunting Area." Bear in mind that this area is popular with hunters, so try to wear something obnoxiously bright until you get above the tree line. Take the paved road back a mile. You'll pass by two fenced-off/tank areas. The second has a water spout that serves up delicious water from the area. If you want to spare yourself from carrying a heavy bag up the long, paved portion, you can fill your water bottles here. You'll thank yourself later. After the second tank, follow the dirt road further up. IMPORTANT NOTE: For Ka'ala, follow purple ribbons and bottle caps up and orange indicators down. You can get lost in the valley very easily if you veer off trail. You gain elevation fast. Immediately you head in an almost straight line up to the ridge. The trail is well-cleared and for the most part well-marked. There are steeper sections toward the top and it gets muddy and slick with even a hint of dampness. If you have micro spikes, this is a great trail to have them. You'll reach the 'three poles' lookout at about 2,800 feet. Soak in the view and look east, that's what you'll be climbing next. From a distance the ridge line looks narrow, steep and brutal. Parts of that are true, but like most trails it isn't as bad once you actually get there. Head up the ridge and be careful as it gets narrower and narrower the higher you get. The drop-offs are pretty severe to the right, so keep your distance if you can. A new fence has been installed for the first 1/2 mile or so (to prevent goats), so you can grip that for security if you'd like. You'll reach two boulder sections. The first is not bad and is more like a large staircase. The second is not as bad as it looks. Though the drop off is to the right, you will need to head up that side first. If you look closely you'll see that someone has carved notches into the lower boulder - you can use these for a foot hold as you make your way up. Once you're a bit further up, you'll see a small area leading up the left, almost like a small platform. Because you can't see this from the ground, the climb looks much more difficult than it is. Head up from there and it is easy from that point on. Hug the rocks if you need and keep your hands on the rope and your feet on something supportive. At no point should you be swinging and/or rappelling. After the second boulder section it gets steeper and steeper. There are fewer drop offs but the climb is relentless until you reach the summit. Be ready for lots of ropes and no real place to take a good rest. Make sure to look back at what you just climbed (and continue to climb) - the views are amazing. You'll top out when the trail levels out. Keep heading along the trail and you'll reach the bog. This is a special place filled with some plant species that only live here - and it is fragile. Make sure to brush the dirt off your shoes (tools provided at trail top) on the way in and on the way out. Stay on the boardwalk and don't damage any of the plants. The boardwalk takes half an hour if you're stopping to look closely and take pictures - which you should. At the end of the boardwalk, you'll reach the base. Follow the road right then head left at the fence, you can circle the base to get views of all sides of the island. We were wrapped in a cloud yesterday but will be going back on a clear day to see this. When you're ready, head back down. Be very careful if it's wet since slipping off the ridge line would be a bad way to end your day and/or life. Extra caution is required on the boulders. This is an upper-intermediate trail with some light bouldering/scrambling required. More than anything, it is a leg burner. Avoid this if you're not OK with some exposure to drop offs and if you haven't done some of the longer town trails. I think a good practice trail would be Kulepeamoa in Niu Valley. The initial ascent is similar - straight up from the valley floor to gain the ridge line, and the climbs, while on different terrain, are close in level of difficulty. Kuliouou West (not the state trail) would be another good one to do prior to Ka'ala, as well. Note that this is not a good trail for dogs (above three poles lookout) and hunters' dogs and hikers' dogs sometimes get in fights. This is also not a good hike for kids if you venture much past the end of the dirt road. read more


10 years ago
I loved this hike and the view at the top was awesome! We could see the north shore and pearl harbor! But I also do a lot of cardio and hike often so the steep and ongoing incline didn't really bother me. To get there we had to drive down this tiny little one lane road and park at the end where there was a gate. Once we started, we walked on a paved path with a slight incline for about a mile and a half before we got to the trail. We walked up the trail for a little bit and saw a picnic table, here the trail went off to the right. After a while there was a split and we took the left side which goes down to a little stream that we crossed and continued to another split about a quarter to half a mile away. We took the right side which is very marked with trail tape. From here, it's ALL uphill! My thighs were burning! After awhile we got to the top of the steep incline up to the fence that divides the mountains and it was dry and slippery with loose sand. Eventually we got to series of ropes which were all in good condition when I went through. When the incline finally evened out there was a little reserve and a wooden walkway through it. Once we made it through this reserve we were there! We made it to the top and it felt so good! There is a military radar installation at the top, but it is fenced off and you are allowed to walk around the fence on the nice grassy area. Overall this hike was a great workout and I am extremely happy I did it. It took about 5 hours round trip, not counting the one hour break we took at the top to admire the scenery. The trip up was quite the trek with a significant incline, but hey the best things in life take work! Tips: -Bring plenty of water. The incline is tiring and there are parts that aren't shaded so you WILL get thirsty. I'm 110lbs and 2L of water was sufficient for me. -Start early. Not only to beat the heat, but when we got there, there were no clouds but they developed significantly during our hour of sitting there due to diurnal heating. -Bring a snack. You will be happy you did when you get to the top. read more


As good as it gets with challenging gains in elevation; breathtaking scenery, native plants, cool native snails, fruits along the way. The trail is considered challenging and requires some upper strength at the rock and rope sections. Reaching the summit is oh so worth it. Bring lunch! This is a hike for those who seek challenge as well as those who appreciate the beauty surrounding our island. It is a well maintained trail. Few areas of drop offs but nothing like sheer cliffs. It can be a muddy trail so for better traction, I suggest spikes. You don't have to but for comfort and ease of mind to not slip on the way down. Ropes, ropes, ropes--and 2 large vertical boulder sections. The first boulder section isn't too bad, the second is a little trickier. I am 5'3" so it was a bit of a climb....had to stop, analyze and receive encouragement from my fellow trekkers. totally appreciated it. Bring at least 2L of water (I had 3.5L and drank 3L); may need bug repellent and sunscreen; shoe spikes and of course your phone or camera. There is service up at the summit and in some areas of the trail. Enjoy! read more


11 years ago
The highest peak of Oahu! I've been there several times. Amazing views at the top. However the weather changes often and could get sucked in by clouds. Don't forget to bring a jacket if you want to stay at the top to enjoy the view. Please be careful if you plan on driving. This is a high theft area. read more


Whew, very tough and steep trail. The first 1.5 miles is up a concrete/asphalt road. Just keep going and you'll finally get to the actual hiking trail. From there it's another 2 miles up and about 2500 feet of elevation since you just gained 1000 feet on that damn road. Luckily, most of the trail is shaded so it's not super hot although many portions of the jungle were really humid. Constant uphill to the top but very doable with only a few rock faces that require use of the ropes already in place. Once at the top you'll walk about 1/2 mile on a wooden plank trail until you escape the bog and you'll see the FAA site right in front of you. Sadly for us this past Saturday, we were in the clouds from about 3/4 up until the summit so the views at the top were blah. I'm sure with no clouds the views at the top are great but hey -- I made it to the top of O'ahu and have the pics of the FAA site to confirm it! Took us a little over 5 hours roundtrip to complete this hike. Bring lots of water (I went through 3+ liters), sun block just in case, microspikes, gloves, lunch, and a hat for the shadeless sections. While it was cool at the top, I didn't need a jacket. Glad to have completed this bucket list hike. Don't think I need to repeat since all of the summit trails on-island have spectacular views. read more


9 years ago
The hike was very muddy and very slippery throughout various areas. It drizzled and poured rain a couple times during the hike. It was humid at times. Other than the paved area that leads to the hike, the hiking trail was covered in foliage for the most part. A bunch of the ropes were so muddy and slippery that I couldn't hold on to the rope; so, I ended up wrapping those ropes around my arm. There were at least 20 ropes (?-lost count) throughout the hike, when you get closer to the top. The ropes were secure when we went in September 2017. Although testing the rope, I couldn't help but wonder just how secure the rope was, especially on the boulders. Although the trail is maintained, there were a few parts of the hike where the erosion of the dirt left very tiny paths where the other side was a steep cliff. While hiking, a young man said he went up to the first rope, and then turned around. While at the bottom of the boulder (mentioned in other blogs), another young man was being told by his friend who made it up the boulder, "...just psych yourself out..."--they both turned around. Another young pair of females said they went up to the picnic table, and then turned around. A father and young son duo turned around... ...so--- while at the 2nd boulder, we had 2nd thoughts about this hike (especially since were warned about all the ropes AFTER the boulders)--but we decided to chug on...The boulders weren't that bad. You can count the people on this hike. There was one other young man who finished the hike around the same time as us. Going up, there were about 6 others on their way down, who had just completed the hike. On our way down from completing the hike, there was a man who said he'd finished the hike in the past, but brought his 10 year old son back to finish the hike this time since his son had stopped at the boulder the last time. The plants at the natural reserve are cool, and makes you feel as though you're walking through some kind of Star Wars movie. I've never seen blue moss before. The clouds covered a lot of the views. It was completely silent up at the top--no sirens, no traffic--just nature. I recommend starting the hike early--just in case you need the extra time before it gets dark. I would not recommended dogs and young children to hike beyond the picnic table. I would not recommend this hike for those individuals who have a "fear of heights." read more


13 years ago
For a heavy set person I was a bit intimidated to even attempt this hike even after completing Stairway to Heaven and Ku'uau crater, however I decided to be brave and attempt it anyway. Although I finished, this hike was definitely grueling. By the way, if your looking for a bad ass hike with the reward of a great view when you get to the top, this hike is NOT it. This hike is what I'd say is an accomplishment bragging rights type of hike. Seriously, once you get to the top, there's a big field with some satellites to look at, big whoop. Anyway, for this hike I definitely packed too much. Bear in mind this is all uphill. I think there was all of one switch back if you can even call it that so packing enough water and a snack or two is all you need. You don't want that extra weight, TRUST ME. I'd say 3 Liters was what I used, however if your more in shape you probably won't need as much. To start the hike you'll have to walk quite a bit on a paved, inclined road. You'll pass a water station, afterwards there will be a nice big puddle of mud in the road which you can maneuver around. After the mud you'll walk up hill again until you reach another water station. Your probably gonna think your at the trail head at this point, NOT. Your then going to start an unpaved road uphill passing a little picnic table on your left, just a little further is where the head of the trail will be. This hike is definitely going to make you sweat so I'd say bring Extra Clothes for after the hike (leave it in your car) and for those that aren't about being sweaty all the time, an extra shirt (to take with you)for once you get to the top to change for the hike back down. It can get a little chilly up top so if you get cold easily you might want to bring a jacket or some rain gear but remember, pack light. You really don't want to bring too much that will add to the weight, again, TRUST ME on this. All in all, I'm glad I did the hike. My legs are a bit sore but getting to the top, priceless. read more


Definitely one of my favorite hikes. The first mile or so after the end of Waianae Valley Rd is a standard walk along a paved road. When the road ends, just keep following the purple markers; it's pretty straight-forward. But as many reviewers mention, the climb will get steep. It is a relentless climb to the top. Thankfully there are rope sections to help you, but be sure to test all ropes first. The journey to the radar station at the summit is roughly 4 miles. When you get to the flat summit, you are treated to seeing a selection of native plants and animals! When you get to the FAA radar installation, you can go around the perimeter (preferably along the left side) to get fantastic views of north and central Oahu! At times, you can see all the way to Diamond Head. It is a view unlike any other! read more


12 years ago
This hike probably 4 1/2 or 5 hour round trip hike if you do it the right way. My husband and I hiked past the paved part, into the woods, and got to a valley. At that point, the trail ascends up to the right along the ridge line OR goes down into the valley. We chose to go up the ridge line to the right. This was NOT correct & leads to the dead end that the poster who asked where to go (a couple posts below) referenced. When you get to the valley, hike DOWN into it. Once you get to the bottom you'll re-enter the woods and the trail is clearly marked. This is how you get to the top of Mt. Ka'ala. As I said, my husband and I hiked all the way up the wrong way, realized it was the wrong way, and hiked back down and back up the correct way. This made our hike a total of about 6 hours round trip (including the time we hung out at the top). My legs were smoked after ascending the mountain TWICE. But it was well worth it. WATER: We each brought 3 liters of water & ran out by the time we were on our way back down this. I think we would've had enough had we gone the correct way up the first time. VIEW AT THE TOP: Once you get to the top, you'll see the big satellite and a sign that says trail ends. A lot of these posters are saying there is no view at the top. We also passed a few people who said there was no view at the top. WRONG. You can see the entire island from the top with the exception of the coastline on the other side of the Ko'olau. BUT you have to walk around the satellite. Hop over the fence, and walk toward the satellite. You'll see there is a worn trail walking around the fenced in satellite location. If you walk around, you can see the entire north shore, Diamond head, etc. DO NOT JUST STOP AT THE TOP WHEN YOU SEE THE SATELLITE! WALK AROUND IT! Enjoy & bring plenty of water! :) read more


 - Hiking Near Me - Waianae, Hawaii")


11 years ago
When my best friend told me we were going to hike this a few days before I arrived in Hawaii, I assumed it'd be an easy hike because she knew I was going to be running a half marathon two days later. In my opinion, the Mt Ka'ala Trail was the most dangerous, strenuous and rewarding hike of my life! I pictured us receiving Medals at the end for hiking 16 miles (up/down) and 4,000 feet up! OMG, what amazing views from that mountain...it was truly an unforgettable experience and I'm glad we did that during my trip. I didn't realize it but this was my first trail that I've ever accomplished and it happened to be the most difficult one. Honestly, it was a great mix of easy hiking, rope challenges, and rock climbing; if you're into that stuff! I'll never forget walking backwards on the last mile down to the car - LOL!!!!! #Ouch read more


 - Hiking Near Me - Waianae, Hawaii")
7 years ago
12 years ago
Does anybody know where to go when, two-thirds of the way up, or about 40-50 minutes steady pace AFTER the paved part.. is a near vertical mountain wall, only dirt and stones going up with nothing to hold on to, and no visible trail markers or fence in the clearing? Its right when the foresty part ends.. Please PM me if you can help. Otherwise.. the trail is varied and while no clear nice views going up, the terrain is interesting and the work-out is great :) read more

13 years ago
Wow what a hike! So this was my second time trying to do it the first time got rained out but today was a great sunny day to do it. I read about this hike and was prepared but for a hike that goes straight up how much can you really prepare lol. I must admit I didn't go all the way to the too just the landing near the too. The last bit of the hike it was cold and raining and cloudy so I figured what's the point of going all the way up if you can't see anything. This hike will test your legs and will power for sure but the views are worth the pain. read more


8 years ago
Crazy hike, very long but absolutely stunning views as you approach the summit climb. This hike isn't for the faint of heart, if you can't handle steep climbs, this hike isn't for you. There are ropes on the last 15-20% of the hike but you will be thankful they are there. read more


13 years ago
7 years ago
11 years ago
12 years ago
Not a bad hike! Was lucky to go during a mostly clear day. Started at 545am so it was kind of creepy/sketch looking getting to the parking area at the bottom. Went early to not get caught in the hot sun like ive done in other trails and it turned out great. If you enjoy actual hiking and not mini trails, this is a good one. Not too easy and depending on the season, not too overgrown. I recommend gloves for rope sections as you descend back down if youre the type to let the ropes slide through your grip to go faster, other than that just comfortable hikimg attire and water. The views are beautiful as are most of the other trails on oahu, but this one has a great view of wainae coast, north shore and even all the way down to diamond head. I would definately do this hike again. Next stop, three peaks and crouching lion! See you there! read more


11 years ago
This is a rad hike. Going up is not too bad, going down gets old reeeaal fast. It took us 7 hrs with a lot of breaks. My GPS said 9.4 miles roundtrip (4.7 each way), but a lot of reviews say 8ish. We did it in a group of 2 super active people and 2 people who who don't really hike or workout (but are in semi-good shape). We were over it by the end, but we were fine. I don't know where the 8 pull-ups and running 4 miles came from! Lol! Similar to olomana 3 peaks but longer and not as technical/sketch. Tips: -follow the purple caps -At the trailhead: Walk up the paved road (just over a mile) until it turns into a dirt path. Follow the dirt path past the picnic area and you'll be on a ridge (for like a minute) and the path will split at a creek. Cross the creek and follow the purple arrow to GO LEFT into the valley (it will eventually go straight up). The only other split is when you get to the pig fence - GO RIGHT. It's all marked with purple tho, so if u remember that you'll be fine ! -Go past the end of trail sign and walk around the satellite. That's where the view is. You can pretty much circle the entire fenced off area to see different angles/views of the island. -2 L of water was fine for me -I did the whole thing in running shorts and a tank top, but you may want to pack a jacket if you're the kind of person who gets cold at 65 degrees. A change of clothes and slippers is nice to have waiting at the car. -Bring gloves for the ropes if u want to go faster going down (which u will b/c it takes forever) -Bring bug spray, sunscreen, snacks (duh) -Don't be a punk. Pick up your trash, stay on the trail (ESP at the bog), be respectful of ppl hunting, etc. Malama da aina! read more


13 years ago
11 years ago
9 years ago
We didn't do the mountain ascent but rather only the foothill scramble for the first 2 miles or so on an unforgiving constant slant on concrete then asphalt single lane past the water reservoirs. Fabulous views of ocean, valley and cliffs. Loved it! read more


12 years ago
One of the best hikes I've ever done. The bog was amazing, the guavas, blackberries, raspberries, and macadamia nuts were all tasty and refreshing!! Took us 6 hours round trip with lots of pictures and a few lazy breaks. Fantastic scenery and the bog is so cool. Blue moss was everywhere!! Definite must-do! read more
 - Hiking Near Me - Waianae, Hawaii")


13 years ago
A beautiful but strenuous hike up into the mountain range. Lots of different jungle atmospheres to trek through. As the elevation changes, so do the trees and vegetation. The hike is a work out and at times very steep. Stick to the purple trail markings. Crazy thing...there was cell service the entire time! read more

10 years ago
Hike only for experienced hikers if you plan on going to the top. Expect this to take about 6 hours round trip.The trail is marked very well! If you see clouds above you as you hike, expect rain and no view. We followed the purple tags & bottle caps. It's 1.25 miles up a steady incline on pavement until you reach the picnic table. Stay to the right. Keep following the purple until the trail splits again and then go downhill to the left. You'll come to a dried up river bed. Cross it and immediately go left. Keep going and you'll hit a metal fence. Turn right at the fence. There is 1 view from the fence line (about 1/1.5 hrs into your hike). It's about another 3 hrs round trip if you keep going to the very top where there's a bog with walkway. Between the fence and the very top there are a lot of ropes and rocks to climb so don't attempt if you're not experienced. I recommend bringing cleated shoes. Rated only 4 stars because there weren't any views along the way. Just 1 at the fence and 1 at the top but the views themselves are pretty amazing. read more


11 years ago
9 years ago
15 years ago
13 years ago
14 years ago
Page 1 of 2
More info about Mt Ka'ala Trail
Northern End Of Waianae Valley Rd
Waianae, HI 96792
Directions
Hours
Outdoor Amenities
Ask the Community - Mt Ka'ala Trail
Review Highlights - Mt Ka'ala Trail
You might also consider


Why does Yelp recommend reviews?
3 reviews that are not currently recommended
The reviews below are not factored into the business's overall star rating.
13 years ago
3 years ago
3 years ago
Mt Ka'ala Trail - hiking - Updated July 2026
Best of Waianae
People found Mt Ka'ala Trail by searching for…
Trending Searches in Waianae, HI
Boat Rental near Mt Ka'ala Trail
Cliff Jumping near Mt Ka'ala Trail
Day Trips near Mt Ka'ala Trail
Dog Friendly Trails near Mt Ka'ala Trail
Jet Ski Rental near Mt Ka'ala Trail
Kayak Rental near Mt Ka'ala Trail
Lakes & Ponds near Mt Ka'ala Trail
Off Road Trails near Mt Ka'ala Trail
Outdoor Activities near Mt Ka'ala Trail
Places To Swim near Mt Ka'ala Trail
Places To Walk Around near Mt Ka'ala Trail
Pool Day Pass near Mt Ka'ala Trail
Public Pools near Mt Ka'ala Trail
Public Shower near Mt Ka'ala Trail
River Swimming near Mt Ka'ala Trail
River Tubing near Mt Ka'ala Trail
Rock Quarry near Mt Ka'ala Trail
Scenic Night View near Mt Ka'ala Trail
Scenic Overlook near Mt Ka'ala Trail
Secluded Spots near Mt Ka'ala Trail
Soccer Store near Mt Ka'ala Trail
Splash Pad near Mt Ka'ala Trail
Sunrise View near Mt Ka'ala Trail
Swimming Holes near Mt Ka'ala Trail
Swimming Lakes near Mt Ka'ala Trail
Watch Sunset near Mt Ka'ala Trail
Browse Articles
Browse Nearby
Browse Brands
Related Searches in Waianae, HI
Affordable Kayak Rental Services in Waianae, Hawaii
Best Fishing Locations and Guides in Waianae, Hawaii
Best Nature Trails for Hiking in Waianae, Hawaii
Best Places for Horseback Riding in Waianae, Hawaii
Best Waterfalls and Swimming Holes in Waianae, Hawaii
Check Out Off Road Trails in Waianae, Hawaii
Discover Dog Friendly Trails to Explore in Waianae, Hawaii
Discover Scenic Hiking Trails in Waianae, Hawaii
Discover Scenic Waterfall Spots in Waianae, Hawaii
Discover Top Nature Parks to Visit in Waianae, Hawaii
Discover Walking Parks in Waianae, Hawaii Near You
Discover a Hiking Trail in Waianae, Hawaii
Discover the Best Night Hike Trails in Waianae, Hawaii
Enjoy Camping Adventures Around Waianae, Hawaii
Enjoy Exciting Mountain Biking Adventures in Waianae, Hawaii
Enjoy Kayaking Adventures in Waianae, Hawaii
Enjoy Tent Camping Spots Around Waianae, Hawaii
Enjoy Water Activities and Fun in Waianae, Hawaii
Enjoy a Beautiful Waterfall Hike in Waianae, Hawaii
Enjoy a Peaceful Nature Walk in Waianae, Hawaii
Enjoy the Best Picnic Spots and Ideas in Waianae, Hawaii
Enjoy the Best Walking Path in Waianae, Hawaii
Enjoy the Best Walking Trails in Waianae, Hawaii
Exciting Cliff Jumping Spots in Waianae, Hawaii
Explore Beautiful Parks and Green Spaces in Waianae, Hawaii
Explore Easy Hikes Perfect for All in Waianae, Hawaii
Explore Fun Activities to Do in Waianae, Hawaii
Explore Popular Campgrounds Near Waianae, Hawaii
Explore the Best Beach Spots in Waianae, Hawaii
Explore the Best Swimming Holes Around Waianae, Hawaii
Explore the Best Trail Options in Waianae, Hawaii
Family Friendly Hiking With Kids in Waianae, Hawaii
Find Popular Ziplining Spots Around Waianae, Hawaii
Find the Best Parks for Picnics in Waianae, Hawaii
Find the Best Scenic View Locations in Waianae, Hawaii
Great Places to Walk in Waianae, Hawaii
Hike the Popular Waterfall Trail in Waianae, Hawaii
Hiking Trails With Waterfalls in Waianae, Hawaii
Off Leash Dog Hiking Trails in Waianae, Hawaii
Plan a Scenic Drive Route Near Waianae, Hawaii
Popular Outdoor Activities to Try in Waianae, Hawaii
Popular Picnic Spots to Visit in Waianae, Hawaii
Safe and Fun Parks for Kids in Waianae, Hawaii
Top Climbing Spots and Gyms in Waianae, Hawaii
Top Paddleboarding Activities in Waianae, Hawaii
Top Places for Snorkeling in Waianae, Hawaii
Top Running Trails to Explore in Waianae, Hawaii
Top Swimming Spots and Pools in Waianae, Hawaii